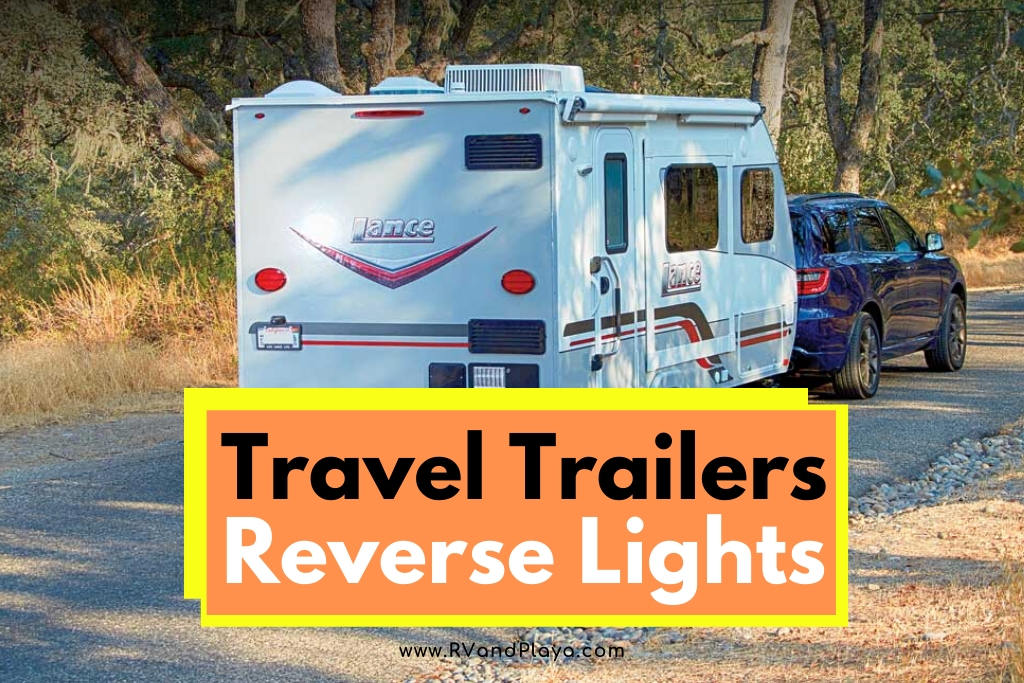
Travel trailers are great lightweight campers that can give you a little luxury while out in the great outdoors. However, like a full-sized camper or RV, they can be difficult to tow. This is especially true when you are backing them up. Having the right lighting at night can make all the difference between a collision and safety.
Do travel trailers have back-up or reverse lights? Yes, many higher end trailers (like toy hauler, cargo, etc) have backup lights built in. You probably have the reverse light circuit wired in if your tow vehicle (with factory tow package) has a seven pin connector.
If you are towing a massive travel trailer in the middle of the night, it is necessary that people behind you can see you. The use of back up lights is necessary, and they are easy to install. If your trailer does not come with back-up lights you need to read on to find out how to install the trailer reverse lights.
Table of Contents
Do Travel Trailers Have Back-Up or Reverse Lights?
Since the Department of Motor Vehicles does not require travel trailers to have back up lights, most manufacturers do not install them on the stock models. However, many higher end trailers (like toy hauler, cargo, etc) have backup lights built in. Even though it is a good idea to have back up lights on your travel trailer, you won’t see them on stock models of travel trailers because there is no legal obligation for manufacturers to add them or owners to use them.
Should You Install Reverse Lights on Your Travel Trailer?
Backing up a travel trailer at night is hard enough. Letting other drivers know you are in reverse can help you to stay out of accidents. Therefore, it is recommended that you install reverse lights on your travel trailer.
Read also: Trailer Lights: 33 Facts You Need To Consider (Explained)
How to Install Back-Up Lights on Your Travel Trailer
You can install the lights on a trailer for backing up with a seven-pin wiring configuration and a new set of lights. It does not matter whether you install the travel trailer lights yourself or having an auto shop install them, back up lights are possible to install on virtually any travel trailer.
Connecting and towing a travel trailer with back-up lights to your vehicle is relatively easy. If you are willing to buy new parts for the connection and the lights, you can install your back-up lights for the travel trailer.
Adding LED Reverse/Backup Lights to an RV or Trailer >> Check out the video below
There are only a few steps that you need to follow to install back-up lights on your travel trailer:
- Purchase the parts.
- Connect the wiring to your vehicle.
- Connect the new lights to your travel trailer.
- Connect the wiring.
Purchasing the Parts
If you are going to install the back-up lights on your travel trailer, you will need two main parts:
- Seven-pin wiring set for both the vehicle and trailer hookups
- Back-up lights that you will install on the back of the trailer
Some of the best seven-pin wiring systems are listed below:
- MICTUNING Heavy Duty 7 Way Plug Inline Trailer Cord with 7 Gang Junction Box – 8 Feet, Weatherproof: The Mictuning wiring has a heavy-duty rubber coating over the length of the wiring and connection heads which allows them to stay safe and dry in any weather conditions. The connection box is flame-proof and has screws for easy and secure installation on your trailer.
- Miady Heavy Duty 7 Way Plug Inline Trailer Cord with 7 Gang Junction Box – 8 Feet, Trailer Wiring Harness with Weatherproof Junction Box: This seven-wire harness system has a weatherproof thick rubber coating on both the wires and connection heads. It has a central pin for reverse lights to be installed and color-coded poles that make the installation of the right cables an easy process.
- Bluefire Upgraded Heavy Duty 7 Way Trailer Connector Plug Cord Inline Trailer RV Plug Cord with Weatherproof 7 Gang Junction Box (6 Feet): The best part about this Bluefire trailer wiring connector is the sealed box that the gang connection has. It is reliable and secure and can be mounted anywhere.
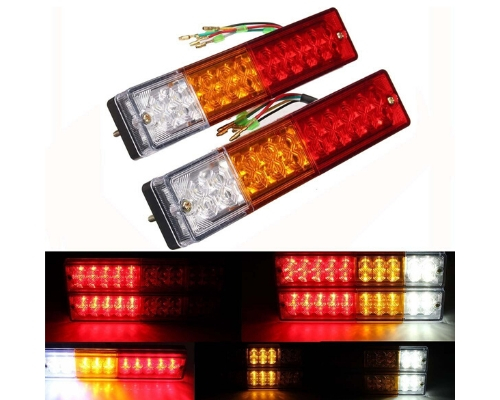
You will also need a set of lights that have the back-up lights included in their design. Although they can be expensive, LED taillights are some of the brightest and best and have come down in price in recent years.
Some of the best back-up lights that you can buy for your travel trailer are listed below:
- 2pc 6″ White Oval LED Reverse Trailer Tail Light Kit: This two-pack of white back-up lights are bright LED lights with grommets for installation included. The polycarbonate lens behind the ten very bright LED lights gives a flash of white whenever they are on, and you start your vehicle.
- Blazer C7425 LED Square Trailer Light Kit with Integrated Back-Up Lights: Blazer has designed a very bright and functional back-up light with this square trailer light kit. The brake lights come on when the brake is tapped or held, and the back-up lights are in the center of the light display. The LED lights are very bright and are better than traditional bulb lights.
- Partsam 2x Oval Clear Lens White Stop Turn Tail Backup Reverse Fog Lights Lamps Rubber Flush Mount 6″ 24 LED for Truck Trailer Boat RV Waterproof: The waterproof design of these Partsam bright white back-up lights are perfect for a travel trailer that you may be used in winter weather. The design and wiring are universal. However, you will need to purchase a plug as well because one is not included in this kit.
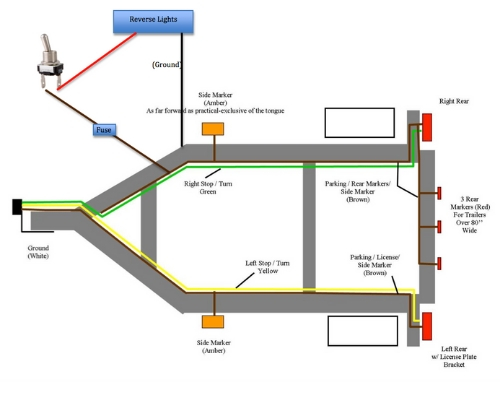
Connecting the Wiring to Your Vehicle
Connecting the wiring to your vehicle and your travel trailer is relatively simple. However, you will need to do some work to get the back-up lights installed. Before you start, make sure you have the seven-pin wiring system with the central pin for reverse lights.
Follow the steps below to install the wiring to the travel trailer and your vehicle:
- Using a plastic wedge tool for cabin panels in your car, prop open the back fuse set. This is usually located somewhere near the tailgate of a truck or in the trunk of cars, SUVs, or vans.
- The seven-pin wiring set can be plugged into this fuse box and should have about four to six feet of wires coming from the plug dangling out.
- Wrap the wires and tie them with a wire holder to the length you need to reach the tongue of the trailer.
- Measure the length of the wire you need to reach the back end of the travel trailer to the tongue where the lights will connect to the vehicle wiring.
- The gauge of the wire you use for the back-up lights can be either sixteen- or fourteen-gauge. Some of the best wire choices for this installation are:
- 16 AWG (True American Wire Ga) CCA Copper Clad Aluminum Primary Wire: The copper-clad wire from True American Wire is made from 42 strands of copper and aluminum metals. The wiring comes in black or red and for twenty-five-foot rolls, perfect for reaching the back end of the trailer.
- Grand General 55244 Red 100′ 14-Gauge Primary Wire: The red fourteen-gauge wire that you receive in this bundle is called the grand general because you get one hundred feet of wire. The outer PVC coating on the wire is also water, chemical, and corrosion resistant.
- Drill the holes where the lights will be mounted on the tail end of the travel trailer. Make sure that the lights will be mounted evenly and as far to the sides of the vehicle as possible.
- When you feed the wire from the holes, you can either zip tie the wires under the carriage of the trailer, or drill holes through the undercarriage to make a straight line for the wire to feed through.
Connecting New Lights to your Travel Trailer
Depending on the lights that you choose to install on the tail end of your travel trailer, the drill holes you make might need to be larger than you initially drilled them for the wiring.
Follow these steps to mount your new lights to your travel trailer:
- The lights you purchased most likely have rubber grommets that should be able to fit into the drilled holes at the tail end of the trailer. These grommets should fit snugly and keep the lights water-resistant.
- Drill out the hole to the size you need to fit the grommet.
- Place the light on the hole and attach the wiring before you attach it to the seven-pin wiring on the vehicle.
- Attach the lights with the bolts or screws that come with it. You may want to drill pilot holes.
Connecting the Wiring
Once the back-up lights are mounted and connected to the fourteen- or sixteen-gauge primary wire that is thread through the body or undercarriage of the trailer, you are ready to hook up the trailer lights to the vehicle.
Follow these steps:
- The trailer will have other wires from the brake lights and possibly even turning signals. The back-up lights should be attached to this bundle for safekeeping. The bundle is usually wrapped in the protective plastic sheathing.
- Each of these wires can be plugged into their corresponding pins on the seven-pin wire plug from the vehicle.
- Make sure that the wires from the back-up lights are plugged into the central pin of the seven-pin wire socket.
7 Pin Trailer Reverse Lights
7 pin trailer reverse lights – Adding Reverse Lights to your Travel Trailer >> Check out the video below:
In Conclusion
Once your vehicle is hooked up with new lights for backing up, you will be traveling much more safely. Even though the law says that you don’t need back-up lights on a travel trailer, the odds are that you will be faced with a nighttime reverse maneuver, and it is better to be safe and bright than sorry.
Sources:
Recommended Reading
Do Travel Trailers Need Alignments? What You Must Know
Does Your Travel Trailer Have an Inverter? Here’s How to Check
Recent Posts
Lowe's offers seasonal recycling programs for Christmas lights at many locations. This guide explains their current policies and helps you make the most of their recycling services. Remember to...
Goodwill's policy on accepting Christmas lights varies by location and season. This guide helps you determine whether your local store will take your holiday decorations and how to prepare them for...