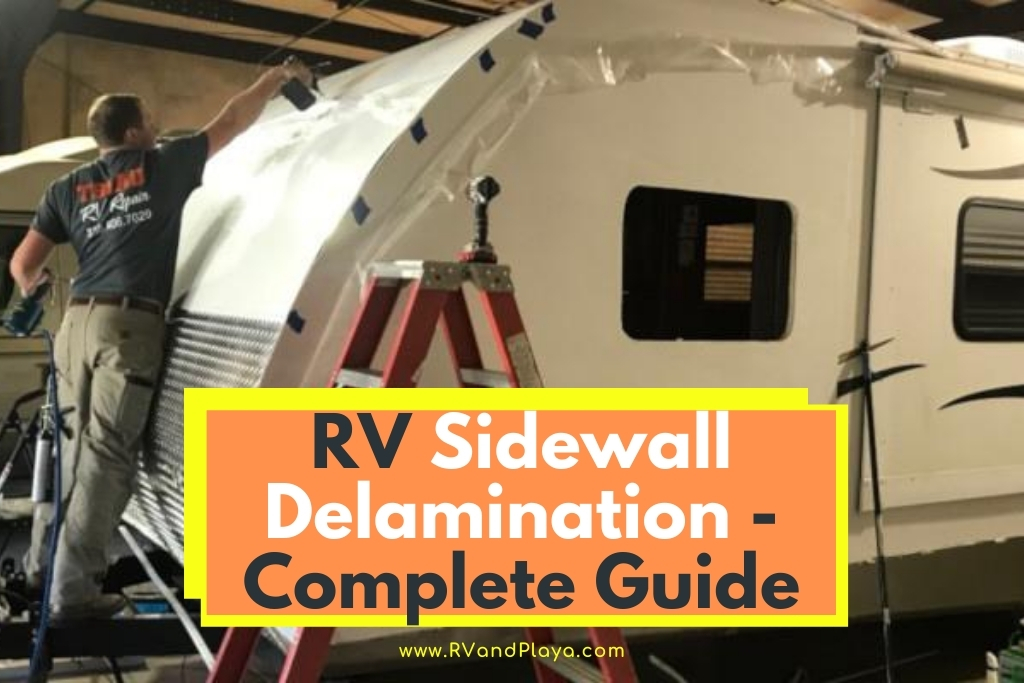
Taking care of your RV is important to keep it running and ready for family road trips for years to come. When the siding on the RV begins to look bubbled or wavy, the vehicle might have some RV delamination.
It’s an issue often easy to miss until it’s too late and too expensive to repair, so it’s important to know the signs of RV delamination.
RV sidewall delamination occurs when debris hits the Styrofoam and wood underneath the RV’s exterior fiberglass, causing bonding agent failure. Delamination is noticeable in the form of bubbles, blisters, waves, and even wood rot inside.
Understanding how it happens and simple ways to fix RV delamination will ensure a long-lasting RV exterior for future road trips. Let’s dive in.
Table of Contents
What is RV Sidewall Delamination?
Today, most RVs are made with fiberglass exterior siding due to its lightweight and long-lasting durabiilty.
It makes RV siding easy to install, but it can cause some issues with delamination down the road.
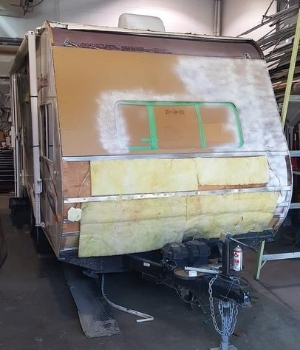
RV sides have several layers – below the exterior fiberglass are two layers of Styrofoam and wood.
Each layer of material is bonded and reinforced to each other. Delamination occurs when debris (such as from the road or natural sources like hail) hits the RV over again. The fiberglass is durable and can bounce back, but the Styrofoam and wood aren’t as strong.
When debris hits the RV sides or roof, it can permanently dent the layers beneath, creating an air pocket that disrupts the bonding between the fiberglass, Styrofoam, and wood.
As the bonding continues to fail and bubbles form, the air pockets grow over time, trapping moisture inside and causing extensive damage if it’s not caught early.
This same issue can also occur from water leaks. If water seeps through a roof or other opening, it can create separation and create sogginess inside the RV sidewalls, also creating bubbles and blisters. Water seepage can also lead to wood rot.
Related reading: Can You Pressure Wash an RV Rubber Roof? [Practical Tips Inside]
Prevent Delamination by Resealing the RV’s Seams
A common cause of RV sidewall delamination is the owner’s mistake of not using lap sealant to reseal seams, and this is the reason delamination is usually not covered by insurance or warranties.
Lap sealant is used to secure horizontal seams and cracks on the RV’s exterior.
The sealant keeps water out and protects an RV’s inner layers from damage.
Lap sealant is relatively inexpensive (about $35 for four tubes), especially compared to delamination repairs.
The failure to regularly use lap sealant (at least once a year, depending on how often you use your RV) can cause extensive damage, including sidewall delamination.
Related reading: How To Repair Travel Trailer Walls [Must-Read]
What Does RV Sidewall Delamination Look Like?
Unfortunately, RV sidewall delamination is not always easy to recognize, as the fiberglass keeps its smooth shape while the underlying damage continues to worsen.
Because delamination repair can become very expensive and/or impossible to fix, it’s important to know the signs of RV sidewall delamination and how to spot it.

Conduct Regular Walkarounds of Your RV
Just like a pilot does an external walkaround of an aircraft before flying it, RV owners should regularly inspect their RV’s exterior.
Walk around your RV (preferably on a sunny day so it’s easier to spot small details) and look closely at all sides and areas near the windows and vents.
Inspect Your RV’s Fiberglass Exterior
The fiberglass on an RV should be flat, smooth, and lacking any disruptions.
Look for any creases or bubbles and press on them. If the crease or bubble feels spongy to press, it’s a sign of delamination.
Use a plastic utensil to press on the same crease to ensure it is a spongy press back.
Check for a Hollow Sound
Does your RV sound hollow when driving or touching/knocking on the sides? This is an indicator of glue separation between the sidewall layers.
The separation and air pockets you’re hearing from the hollow sound means your RV has sidewall delamination.
Inspect Creases and Waves When the RV is Parked in the Shade
Park your RV somewhere shady and watch how the bubbles change.
As the temperature drops in the shade, the bubbles and waves on an RV with sidewall delamination will become small and flat.
How to Fix RV Sidewall Delamination?
When the problem has gone too far, RV sidewall delamination repair is often not worth the cost and effort.
Air pockets and water inside the walls will have weakened the vehicle’s structure, and mold on the damp wood layers can cause health issues.
It’s hard to find these problems without completely stripping away the outside the RV – and it’s not a cheap thing to do.
Despite the cost and difficulty of repairing extensive RV sidewall delamination, there are a few things you can do to fix minor delamination and even prevent it from happening in the first place.
However, fixing delamination yourself is no easy task, and you must be willing to put a lot of time and effort into repairs.
Easy DIY wall fix for Bulges & Bubbles on the Sidewall >> Check out the video below:
Purchase a Delamination Repair Kit
If you’ve noticed minor RV sidewall delamination, you can use a delamination repair kit to fix the issue before it gets worse.
Kits cost between $100 and $300 depending on how much surface you need to cover and how many applications you need.
Delamination repair kits include an instruction sheet and a bonding agent to re-seal the fiberglass, wood, and Styrofoam layers.
There are also syringes included to insert the glue or resin into small and tight areas. It’s important to note that if your RV has water damage in any of the inner layers, a delamination kit will not work.
To use a kit and re-glue inner layers, you’ll have to remove the outer fiberglass to access the wood and Styrofoam.
Use the syringes and tubing to get into hard-to-reach areas. Consider purchasing clamps to secure the newly glued areas and let them dry.
While delamination repair kits are a simpler, cheaper, do-it-yourself option, it’s not permanent.
It’s easy to miss spots when using the kits, and cracks, bubbles, and creases will reappear within some time.
Tips for Successful DIY Delamination
Here are some tips for fixing RV sidewall delamination yourself:
- Before you begin, identify the areas you need to repair and mark around it with tape
- Work from the bottom toward the top when injecting the bonding agent
- Cover as much of the area around the treatment area with plastic and tape
- Inject the agent above the area you are treating because it runs down the side
- Put pressure on the treated areas as soon as possible so it doesn’t run down the side
- Mix small batches over large batches so you can inject the agent quickly before the mixture reacts and dries
- Do not reuse the syringe and tubing on repeated applications over several days – use a new one each day
- If you want to use clamps, make extras in case the project is larger than expected
- Always test the section you’re treating – make sure you can insert the tubing and syringe and the clamping works before using the agent
Fixing RV Sidewall Delamination at a Repair Shop
Unfortunately, in many cases, the delamination is too extensive, and owners must take their vehicle to a shop for a costly repair.
An RV body shop expert will be able to tell you from the start whether it can be repaired or if it’s time to retire the RV.
If there is water damage in addition to the delamination, the entire sidewall will need to be replaced. If this fix is possible, a delamination repair can cost thousands of dollars, so be prepared.
How To Stop RV Delamination
How to stop RV delamination >> Check out the video below:
Frequently Asked Questions
Here are a few common questions people often have about RV Sidewall delamination:
How Much Does it Cost to Reseal an RV Roof?
How much does it cost to reseal an RV roof? The professional dealerships that specialize in RV repair and maintenance charge over 1000 dollars for the job and $1,500 to $2,000 for a full reseal on larger RVs.
The cost of resealing your RV roof is dependent on many factors, the first being the kind of materials that make up your roof.
EPDM Roofs have the advantage of being an extremely durable rubber roofing membrane and go by the tongue-twisting name of (Ethylene Propylene Diene Terpolymer.)
Fiberglass Roofs are easier to maintain and are lighter and more aerodynamic and save on gas mileage. The cost to repair and the roof is much steeper than the costs of an EPDM roof.
Rubber TPO roofs are made of thermoplastic polyolefin, which is a type of single-ply rubber.
Aluminum roofs are quite rare nowadays and can easily hide damp until it’s too late. They are relatively low maintenance roofs and are durable if maintained.
You have the option of doing the job yourself and saving money, but it is quite specialized and labor-intensive, and you have to know what you are doing.
How to Easilly Seal Your RV Roof Like a Pro >> Check out the video below:
How Long Does an RV Roof Last?
How long does an RV roof last? On average Rubber roofs usually have a 10-year plus guaranteed lifespan, but with maintenance and preventative care, it could reach 20 years.
RV roofs come in various materials, but as a general rule of thumb, your RV roof generally has a 20-year lifespan on its own.
This time is the reason why maintenance and preventative measures are so essential to extend the lifespan of your RV’s roof.
The roof type of your RV has everything to do with how long your roof lasts. To extend the life of your RV roof is suggested that you should recoat your roof every 3 to 4 years.
This measure may prolong your RV roof’s lifespan for another 20 years if it is accompanied by strict sealant maintenance.
The most common types of roofs are:
1 EPDM Roofs
Rubber roofs are extremely durable and one of the less expensive types of roofs to maintain. They are the type of roof most commonly found on RVs and travel trailers today.
EPDM roofs don’t dent and scratch easily, but it is easy to puncture by something like a falling branch, and it absorbs a lot of the sun’s energy leading to wear and tear.
2 TPO Roofing
The TPO roofing is white and reflects sunlight and suffers less from the sun’s damage. It has been gaining popularity steadily as a less expensive reflective option for RV roofs.
The TPO roof must be covered with a proper laminate, or it can crack and develop weakness reasonably quickly.
Average Lifespan: TPO roofs last around ten years and easily make 20 years with the proper care.
3 Fiberglass Roofs
Fiberglass is durable and has a low risk for cracks and damage, and you may extend its lifespan by adding a protective wax layer over your roof.
Fiberglass can develop hairline cracks and are prone to oxidation, if not adequately maintained.
Average Lifespan: Fiberglass roofs last about 10 to 20 years with proper maintenance
4 Aluminum Roofs
These types are roofs are not often found anymore. They are generally lower maintenance than other types of RV roofs. Aluminum roofs are prone to moisture damage caused by leaks,
Average Lifespan: About ten years and more with routine repairs
How To Increase The lifespan of Your RV Roof?
1. Keep it clean
You should clean your RV roof regularly of dust and debris and any other dirt that can speed up the aging process.
Rather clean your roof from the side as it puts less pressure on the roof. Make sure you use the correct cleaning agent for your roof type.
2. Cover your roof when not in use
Choose a cover that is durable and UV resistant to protect your RV when not in use.
Related reading: How to Choose the Perfect Cover for Your Travel Trailer [Read This First]
3. Prevent leaks
Leaks are the most common cause of a lowered life expectancy of your RV roof. Caulk areas prone to leaks to make sure they are watertight.
Make sure your caulking is compatible with your roof material.
Related reading: Can You Pressure Wash an RV Rubber Roof? [Practical Tips Inside]
How Do You Fix Delaminated Plywood?
If your damage extends over a whole wall or most of it, it is suggested to leave the process to professionals with the necessary tools and space.
Smaller areas of around a few square feet, you can perform the repair yourself with a bit of effort.
- Cut away the section of your wall paneling to expose the damaged area. Remove the insulation to expose the frame and plywood.
- Cut away the damaged or rotted wood area, making sure your cuts in the plywood sheathing are neat and square for patching.
- Fit your replacement plywood into place and secure it to the wood timbers on either side of it. Then replace the missing timbers and secure them to the good parts of the remaining frame and the plywood patch.
- Drill small holes through the plywood in a grid pattern. Pour the adhesive through the holes so that it runs down into the bubble where the plexiglass skin has moved away from the plywood.
- Press a sheet of plywood to the exterior wall to apply even pressure to the plexiglass and clamp it firmly into place.
- Remove clamps when the adhesive is dry, and you will find that the bubbled skin is now flush with the wall. You may then replace insulation in the repaired section of the wall. Make sure to tape any air leaks in the area that you have repaired before closing it up.
- Finish your repair by finding a matching panel and fitting it over the repair.
What Causes Fiberglass Delamination?
What causes fiberglass delamination? Separation of the bonding agent can also happen when water seeps through a window, roof, or vent seam without proper sealant. This moisture results in those ugly blisters and waves found on the outside of RVs.
Fiberglass siding is built in layers like a sandwich. The outer and inner decorative walls are the bread, and the in-between layers are the filling, two layers of wood and styrofoam.
These fillings these materials are vacuum-bonded together and then to the outer layers to provide backing.
Although the fiberglass is durable, the inner components aren’t, and impacts against the fiberglass may only show inside the wall as dents in the styrofoam and boards.
As a result, a convex air pocket that causes separation and will grow in size as the fiberglass flexes.
The bubble then cracks and trap moisture and further damage.
How often should you coat your RV roof?
How often should you coat your RV roof? Generally, it is necessary to recoat your RV roof every 5 to 6 years, without forgetting to conduct a thorough seal inspection should take place at least twice a year.
However, an RV roof should last you 20 years before being replaced. During that time, you should begin to expect leaks at around the 5-year mark, depending on conditions and usage.
Using an RV roof coating before that time can significantly increase the longevity of your roof.
So, as prevention is better than cure strategy, a great rule of thumb is to recoat your RV roof around the three or four-year mark.
Its a far better alternative than dealing with leaks a year down the line.
What Causes RV Delamination?
Is the floor or wall of your RV feeling a bit soft? Or is it making a noise? This is probably delamination which you should take action on immediately!
Your campervan’s floor or wall is made from many layers that are glued together. When this starts to wear off, we call it delamination.
In other words, the layers are beginning to peel apart. It’s a very common problem so act fast and you’ll be fine.
So, what causes this, then? We’ll get right into that.
By now, you are probably thinking that it is your fault. Maybe you’re quite flat-footed, or you dropped a metal pan the other day, or you spilled some wine and it’s caused delamination. But honestly, it’s not you.
Sadly, the glue that keeps the insulation and plywood bound becomes less effective over time. This is just general wear and tear (unfortunately).
Although, things like leaks and flooding can make the problem a lot worse, much faster. So keep an eye on the overall health of your vehicle at all times.
RV Delamination Repair Cost
Okay, now you know the causes of this pesky issue, let us get into the nitty-gritty money stuff.
Beforehand, we should mention that it is possible to fix it yourself. But don’t underestimate just how hard it can be.
Anyway, we’ll talk more about that in the next section. For now, we’ll talk cash!
If you are planning to do it yourself, you just have to purchase the materials.
Surprisingly, you can buy almost everything you need on Amazon (maybe we shouldn’t be so surprised by that, but here we are).
You will need around $200 for everything. However, if you don’t have the right tools to hand, you’ll need to shell out for these too (or borrow them from a friend).
For those of you who aren’t so handy with DIY projects, you should enlist the help of a professional RV guy (yep, that’s the technical term!).
Obviously, you will have to pay for this. The exact price will depend on the specific garage you to take it to.
How to Repair or Fix Delaminated Fiberglass on RV
Remember when we said that you can repair sidewall delamination in your RV yourself? Great! Here is where you find out exactly how to do that.
Step One: Gather your tools
You will need the following:
- Epoxy resin
- Resin hardener
- Plastic syringes
- Plastic tubing
- Mixing cups
- Scrap wood pieces
- Wedges and shims
- Rubber gloves
- Plastic sheet
- Various basic tools (that you will already have if you are DIY inclined)
Step Two: Consider the Logistics
Ask yourself:
- Where are you going to park your camper during the repair?
- Can you cover it if necessary?
- Do you have all the tools?
- How will you brace it?
- How many areas do you need to treat?
Step Three: Make the Braces
You need to use the scrap wood pieces to brace the repair section. You’ll have to decide which design works best for you.
Step Four: Make an Epoxy Injector
This part is easy. Just tape the plastic tube to the syringe. Aluminum tape is the way to go here.
Step Five: Mark Up
Use painter’s tape to mark the areas that need injecting.
Step Six: Gain Access
Take the doors, windows, edging, and trim off so you can get to the area that needs repairing.
Step Seven: Mix Epoxy
You need to mix a small amount of epoxy with the hardener.
Step Eight: Inject
Load the injector with the epoxy mixture. Then press the syringe slowly while pulling it out of the delaminated side to fill the gaps.
Step Nine: Press and Clamp
Once filled, immediately press it down to ensure everything bonds together. Make sure you add a clamp to secure it.
Step Ten: Repeat
Repeat this process for the entire area.
Step Eleven: Reinstall and Reseal
The final part is to replace everything you removed in step six! Well done!
How Common Is RV Delamination?
We mentioned earlier that RV delamination is very common — and we stand by that wholeheartedly! Many RV owners have to deal with it over their lifetime.
So, don’t feel disheartened! You just need to fix it as quickly as possible.
RV Delamination Insurance Claim
Is RV delamination covered by insurance? NO. Although RV delamination is common, it is rarely covered by RV insurance or extended warranties.
Why?
Because there are preventative and maintenance measures that you, the owner, can do to keep your vehicle in tip-top condition for as long as possible.
We suggest you periodically reseal your walls, roof, and floor to protect against delamination as much as possible.
Most RV garages know exactly what to do when it comes to sidewall delamination. If in doubt, let the professionals take the wheel (so to speak) and fix this super common issue for you.
Read also: Does RV Insurance Cover Water Damage? What You Need To Know
RV Delamination Repair Kit
Having an RV delamination repair kit can save your camper’s life (and possibly yours).
You can either buy one from Amazon and other online stores or you can purchase all the materials separately.
You will need to do the math on this but the pre-made kits tend to be a bit cheaper.
Usually, you will receive the following when you purchase an RV delamination repair kit:
- Bonding system (the brand will depend on the company you buy the kit from)
- Injection syringes
- Small and large injection tubing
- Mixing cups (you usually get 2 in a pack)
- Preparation trowel
- Mixing trowel
- Gloves (they will be chemical resistant, typically 2 pairs in a pack)
- Composite shims
- Mixing sticks
- Instruction sheet
- Data sheet
- Tech support contact information
What Are Signs of Fiberglass Delamination?
It’s important to know how to spot fiberglass delamination on your RV. Why? Because otherwise, you might be driving around in a very dangerous vehicle.
Here are the signs you should look for:
- Waves
- Bubbles
- Creases
- Soft to the touch or spongy
- Tap any dented places with a plastic spoon, if it sounds hollow, it’s delamination
- Bubbles and waves that get smaller or flatter when you RV is placed in the shade
RV Roof Delamination
RV Roof and Delamination >> Check out the video below:
Selling A Camper With Delamination: What To Consider
Delamination is often the sign of another underlying problem. Most often, delamination in RVs is caused by some form of water intrusion.
The cost to strip the materials and potentially replace them can cost more than the RV is worth in value, so this is something that may turn someone off from buying it.
Should you sell your camper with delamination? No. The best thing to do would be to find the source of the problem and try to fix it yourself before selling it.
If this is not something you are able to do or are simply not wanting to do, you will most likely need to drop the sale price significantly in order to give the buyer a better incentive to purchase.
An RV with delamination is not impossible to sell, however, it isn’t the best news for buyers so don’t expect to be making much of a profit or any at all.
Travel Trailer Front Cap Delamination
If you notice your travel trailer showing signs of delamination, it’s best to start tending to the problem right away.
In minor cases where the travel trailer front cap lamination is just starting to pull away, you can attempt to reseal it with an epoxy or adhesive. This will remove any visible delamination and will hopefully keep it from worsening.
Since delamination usually occurs from some form of water damage, you’ll also want to check for any broken seals or active leaks around your trailer.
It is vital to locate these areas and correct them right away. If left untreated, the water will continue to cause delamination and can eventually rot away the materials.
With travel trailers, the front cap is usually less expensive to replace than RVs so in extreme cases of delamination and rot it is best to fully replace it.
Best Epoxy For RV Delamination
One common and affordable solution for fixing RV delamination is to apply an epoxy resin on the inside of where the delamination is occurring and use pressure to reseal the area.
This helps to bind the materials back together and since epoxy is clear, you won’t be able to noticeably see the patchwork.
The best epoxy that has been tried and true for RV delamination repairs is West Marine. There are many locations to purchase this resin kit from and it is injectable so it is perfect for this type of fix.
The kit comes with epoxy and harder, which you will mix together to create the solution, and pumps that you can use to directly inject it.
This solution is the best option for those with minor yet noticeable delamination and should help to improve the longevity of the RV itself.
RV Delamination Adhesive
If you just noticed your RVs lamination beginning to separate, then an adhesive solution is a great choice. This method is not to be used on large areas and is meant more for smaller fixes.
There are multiple types of delamination to choose from but the best results will come from the combination of applying pressure for 24 hours after applying the adhesive.
The best types of adhesive are gorilla glue and resin, both epoxy or polyester. These can be purchased online or at most hardware stores, so it is easy to access and just as easy to use.
An adhesive should be used the same way mentioned above as the epoxy resin.
RV delamination adhesives will help to bind the materials back together and fix the overall appearance of the delamination. In order for this to be effective long term, all leaks and seals should be checked and fixed as well.
Recent Posts
Many people can relate to unexpected water damage to either our home or RV. Whether it is caused by a faulty seal or an open window, the damage that water can do is surprising and often leaves us...
Being a travel trailer owner is a rewarding and enlightening experience for you and your family. The weekend retreats and vacations will create lasting memories that bind your family in love and...