Fault Code 14 on Onan generators is perhaps one of the most common issues that RV owners run into with their generator.
Fault code 14 is an indicator of a few different possible issues, so narrowing it down and finding the solution isn’t as easy as it sounds.
Having a consistent power source to your motor home or RV is a must, especially if you plan on going off the beaten path.
Keep reading to find out what could be causing the fault code, and which of those causes can be solved without a professional.
Table of Contents
How to Fix Fault Code 14 on Onan Generator
A generator is the primary source of power for RVs, so taking care of yours is imperative to an enjoyable RV experience.
Any kind of fault code is alarming at first, but fault code 14 on an Onan Generator is one of the easiest to remedy on your own, in most cases.
FIX FAULT CODE 14: Onan 4000 generator fix, runs fine then stops >> Check out the video below:
Fault code 14 means that your Onan Generator is running over frequency or too fast to function correctly.
Multiple causes could be prompting fault code 14, more of which we’ll dive into later.
For now, let’s focus on what you can do to get rid of that fault code and get back to enjoying your RV.
Read also: How to Use a Generator with a Travel Trailer: Complete Guide
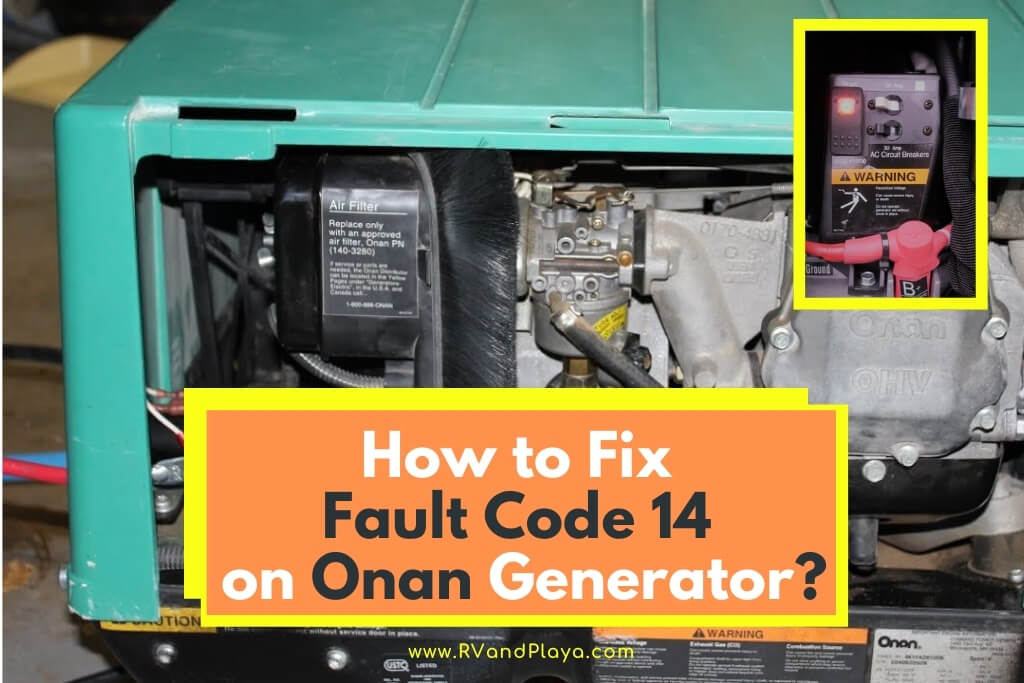
Locating the Fault Code on Onan Generator
Before you can begin to repair anything, or even troubleshoot, you will need to figure out which error code you have.
If you are reading this, then chances are you have already found it, but for those who are unsure, this is the process you will need to follow.
- First, locate your generator.
- Next, find the primer button. The primer button should be easily accessible and connected to your “on” switch.
- Now press the primer three times. You do not need to do this rapidly, but you will need to make sure you get all three presses within a five-second time frame.
- After you have pressed the button three times, a light will start to flash. It should flash three times in succession and then pause. Your next step will be to press the button one more time, but before you do that, make sure you are ready to count.
- Once you press the button, the pattern of three flashes will stop and will switch to a new pattern. This new pattern will tell you your fault code. There will be a series of flashes, a pause, the second series of flashes, a pause, and then it will loop back around.
- The first series of flashes will indicate the first digit, and the second series will indicate the second digit.
This means that if your light flashes once, pauses, and then flashes four times, your error code is fourteen.
If you don’t see this fault code, then you have a different issue than fault code 14 on your hands.
If that is the case, and 14 is the fault code, then this article should help you get started with the troubleshooting part of this tutorial.
Again, if that is not your pattern, and you’ll need to check your owners manual to identify the fault code.
Helpful Hint
It is essential to pay attention as soon as you press the button to begin the sequence so that you do not get it mixed up.
You would have a completely different code if you thought the first pattern was the four flashes instead of the single flash.
Once you have made sure your error is error code 14, you can reset your primer by pressing it twice in quick succession.
Troubleshooting to Identify the Source
As stated earlier, several factors could have caused this error.
Going over the intricate details of how to find and solve each issue is beyond the scope of this article, but we will cover some of the most common causes and what your options are for fixing them.
If you want a more in-depth guide on how to troubleshoot for error code 14 or any error code, flight systems has extensive troubleshooting guides available for free.
It is essential to keep in mind, however, that if you plan on doing the work yourself and are under warranty, you may void your warranty.
So, if you want to keep your warranty intact, make sure to check with the dealership or your warranty agreement before starting any work.
Read also: Should an RV Inverter Be Left On? Does it Hurt the Battery?
Identify Simple Solutions
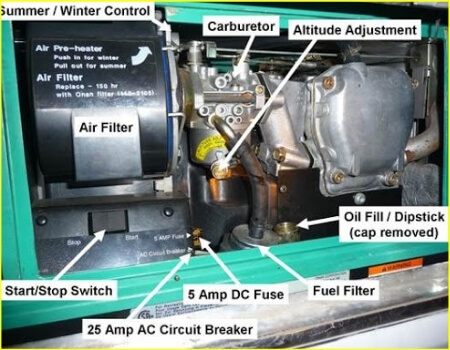
Before you dig too deep into finding the problem, make sure you have at least ¼ tank of gas.
This can cause your Onan generator to give a fault code, but it’s a straightforward fix.
Also, make sure your oil levels are not too high or too low. The mark should be between add and full.
Lastly, try to clean the air filter that leads into the carburetor.
Check the Carburetor
If you decide you do not want to take your vehicle to a mechanic and instead work on it yourself, then it is essential to know that the carburetor is the most common reason for your generator motor to overworking.
To fix your carburetor, you will either need to clean it thoroughly or replace it.
Most mechanics will opt to replace it because cleaning it is more trouble than it’s worth most of the time.
If you want to access your carburetor, you will need to squeeze several tools through tight fits around your generator.
Reinforce Circuit Board Connections
Another cause for code 14 is the circuit board that regulates the speed.
If it is the circuit board, there are replacement ones you can buy, but depending on which model generator you have, you may need to have soldering knowledge.
Others have connector pins that plug into the circuit board, which can be removed and plugged into the new one.
A Malfunctioning Governor
The above two are the most common, but some additional problems may be causing it.
One of these is your governor.
The governor is responsible for measuring and regulating speed in your generator’s engine.
If it is unable to measure correctly, the generator may be overworking and then shutting down.
If your generator is the issue, you should be able to take it off your generator and replace it with a new one.
There are kits online that will come with the necessary gaskets and pieces.
Beware of Critters
Another potential reason for your problem is animals. Before doing any work, you should check to see if the housing or area around your generator has nested.
Additionally, you should check for chewed wires. Either of these would be a clear indicator of rats.
Depending on how often you use your generator, this may be more possible than you might think.
Leaking Air Intake Wires on the Actual Generator
Make sure to check your air intake for leaks. The wiring can be problematic in a few places, but the most common one is two visible ones coming out from your generators on a switch.
If you have had work done on your generator before it is possible, these two wires were reconnected incorrectly.
Prevent Fault Code 14 from Reoccurring
Regardless of whether you chose to go to a mechanic or work on the generator yourself, you will want to prevent this from happening again. Luckily, doing so is much easier and cheaper than fixing it.
To keep your generator in its best shape, it is essential to exercise regularly.
This means that even if you do not use your generator, you should occasionally turn it on and use it.
However, it would help if you didn’t overload it, instead try to use about a half load for a while.
Simply turning it on will prevent varnish from accumulating on your carburetor and will help your generator stay healthy.
Recent Posts
Lowe's offers seasonal recycling programs for Christmas lights at many locations. This guide explains their current policies and helps you make the most of their recycling services. Remember to...
Goodwill's policy on accepting Christmas lights varies by location and season. This guide helps you determine whether your local store will take your holiday decorations and how to prepare them for...